whistle代理调试工具

首先看官方文档:http://wproxy.org/whistle/

whistle(读音[ˈwɪsəl],拼音[wēisǒu])基于Node实现的跨平台web调试代理工具,类似的工具有Windows平台上的Fiddler,主要用于查看、修改HTTP、HTTPS、Websocket的请求、响应,也可以作为HTTP代理服务器使用,不同于Fiddler通过断点修改请求响应的方式,whistle采用的是类似配置系统hosts的方式,一切操作都可以通过配置实现,支持域名、路径、正则表达式、通配符、通配路径等多种匹配方式,且可以通过Node模块扩展功能

这里简单介绍下安装

安装启动

安装启动whistle,需要以下四个步骤: 安装Node安装whistle启动whistle配置代理

1. 安装Node

whistle支持v0.10.0以上版本的Node,为获取更好的性能,推荐安装最新版本的Node。

如果你的系统已经安装了v0.10.0以上版本的Node,可以忽略此步骤,直接进入安装whistle的步骤,否则:

  1. Windows或Mac系统,访问https://nodejs.org/,安装LTS版本的Node,默认安装即可。
  2. Linux下推荐使用源码安装: 从Node官网下载最新版的Source Code(或者用wget命令下载),解压文件(tar -xzvf node-vx.y.z.tar.gz)后进入解压后的根目录(node-vx.y.z),依次执行./configure./make./make install

安装完Node后,执行下面命令,查看当前Node版本

$ node -v
v4.4.0

如果能正常输出Node的版本号,表示Node已安装成功(Windows系统可能需要重新打开cmd)。

2. 安装whistle

Node安装成功后,执行如下npm命令安装whistle (Mac或Linux的非root用户需要在命令行前面加sudo,如:sudo npm install -g whistle

$ npm install -g whistle

npm默认镜像是在国外,有时候安装速度很慢或者出现安装不了的情况,如果无法安装或者安装很慢,可以使用taobao的镜像安装:

$ npm install cnpm -g --registry=https://registry.npm.taobao.org
$ cnpm install -g whistle

或者直接指定镜像安装:
$ npm install whistle -g --registry=https://registry.npm.taobao.org

whistle安装完成后,执行命令 whistle help 或 w2 help,查看whistle的帮助信息

$ w2 help

 Usage: whistle <command> [options]


  Commands:

    status              Show the running status of whistle
    use/add [filepath]  Set rules from a specified js file (.whistle.js by default)
    run                 Start a front service
    start               Start a background service
    stop                Stop current background service
    restart             Restart current background service
    help                Display help information

  Options:

    -h, --help                                      output usage information
    -D, --baseDir [baseDir]                         set the configured storage root path
    -z, --certDir [directory]                       set custom certificate store directory
    -l, --localUIHost [hostname]                    set the domain for the web ui of whistle (local.whistlejs.com by default)
    -L, --pluginHost [hostname]                     set the domain for the web ui of plugin  (as: "script=a.b.com&vase=x.y.com")
    -n, --username [username]                       set the username to access the web ui of whistle
    -w, --password [password]                       set the password to access the web ui of whistle
    -N, --guestName [username]                      set the the guest name to access the web ui of whistle (can only view the data)
    -W, --guestPassword [password]                  set the guest password to access the web ui of whistle (can only view the data)
    -s, --sockets [number]                          set the max number of cached long connection on each domain (60 by default)
    -S, --storage [newStorageDir]                   set the configured storage directory
    -C, --copy [storageDir]                         copy the configuration of the specified directory to a new directory
    -c, --dnsCache [time]                           set the cache time of DNS (30000ms by default)
    -H, --host [host]                               set the listening host (INADDR_ANY by default)
    -p, --port [port]                               set the listening port (8899 by default)
    -P, --uiport [uiport]                           set the listening port of whistle (8900 by default)
    -m, --middlewares [script path or module name]  set the express middlewares loaded at startup (as: xx,yy/zz.js)
    -M, --mode [mode]                               set the way of starting the whistle mode (as: pureProxy|debug|multiEnv)
    -u, --uipath [script path]                      set the path of custom web ui
    -t, --timeout [ms]                              set the request timeout (66000ms by default)
    -e, --extra [extraData]                         set the extra parameters for plugin
    -f, --secureFilter [secureFilter]               set the path of secure filter
    -R, --reqCacheSize [reqCacheSize]               set the cache size of request data (600 by default)
    -F, --frameCacheSize [frameCacheSize]           set the cache size of webSocket and socket's frames (512 by default)
    -V, --version                                   output the version number

如果能正常输出whistle的帮助信息,表示whistle已安装成功。

3. 启动whistle

最新版本的whistle支持三种等价的命令whistlew2wproxy

启动whistle:

$ w2 start

Note: 如果要防止其他人访问配置页面,可以在启动时加上登录用户名和密码 -n yourusername -w yourpassword

重启whsitle:

$ w2 restart

停止whistle:

$ w2 stop

调试模式启动whistle(主要用于查看whistle的异常及插件开发):

$ w2 run

启动完whistle后,最后一步需要配置代理。

4. 配置代理

配置信息
  1. 代理服务器:127.0.0.1 (如果部署在远程服务器或虚拟机上,改成对应服务器或虚拟机的ip即可)
  2. 默认端口:8899 (如果端口被占用,可以在启动是时通过 -p 来指定新的端口,更多信息可以通过执行命令行 w2 help (v0.7.0及以上版本也可以使用w2 help) 查看)

勾选上 对所有协议均使用相同的代理服务器

代理配置方式(把上面配置信息配置上即可)
  1. 全局代理:直接配置系统代理:
    • Windows
    • Mac: System Preferences > Network > Advanced > Proxies > HTTP or HTTPS
       

      * Linux: Settings > Network > VPN > Network Proxy > Manual

       
  2. 浏览器代理:安装浏览器代理插件 (推荐)
    • 安装Chrome代理插件:推荐安装SwitchyOmega

      * Firefox: 地址栏输入访问 `about:preferences`,找到 `Network Proxy`,选择 `手动代理配置(Manual proxy configuration)`,输入代理服务器地址、端口,保存

       
  3. 移动端需要在设置中配置当前Wi-Fi的代理,以 iOS 为例:

PS: 如果配置完代理,手机无法访问,可能是whistle所在的电脑防火墙限制了远程访问whistle的端口,关闭防火墙或者设置白名单:http://jingyan.baidu.com/article/870c6fc317cae7b03ee4be48.html

访问配置页面

启动whistle及配置完代理后,用Chrome浏览器(由于css兼容性问题界面只支持Chrome浏览器)访问配置页面,如果能正常打开页面,whistle安装启动完毕,可以开始使用。

可以通过以下两种方式来访问配置页面:

阿里云CentOS 7上安装配置Docker

Docker 是一个开源工具,它可以让创建和管理 Linux 容器变得简单。容器就像是轻量级的虚拟机,并且可以以毫秒级的速度来启动或停止。Docker 帮助系统管理员和程序员在容器中开发应用程序,并且可以扩展到成千上万的节点。

1

这是一只鲸鱼,它托着许多集装箱。我们可以把宿主机可当做这只鲸鱼,把相互隔离的容器可看成集装箱,每个集装箱中都包含自己的应用程序。

Docker与传统虚拟区别

传统虚拟化技术的体系架构:

2

Docker技术的体系架构:

3

容器和 VM(虚拟机)的主要区别是:

  • 容器提供了基于进程的隔离,而虚拟机提供了资源的完全隔离。
  • 虚拟机可能需要一分钟来启动,而容器只需要一秒钟或更短。
  • 容器使用宿主操作系统的内核,而虚拟机使用独立的内核。

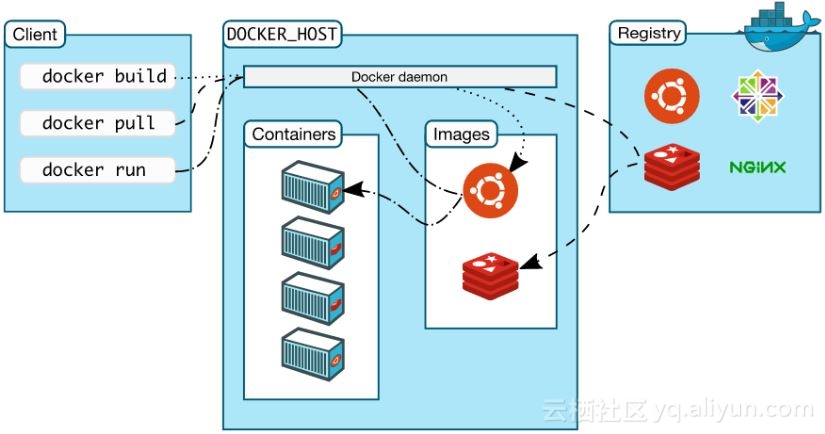
Doker 平台的基本构成

4

Docker 平台基本上由三部分组成:

  • 客户端:用户使用 Docker 提供的工具(CLI 以及 API 等)来构建,上传镜像并发布命令来创建和启动容器
  • Docker 主机:从 Docker registry 上下载镜像并启动容器
  • Docker registry:Docker 镜像仓库,用于保存镜像,并提供镜像上传和下载
  • 后面的文章会具体分析。

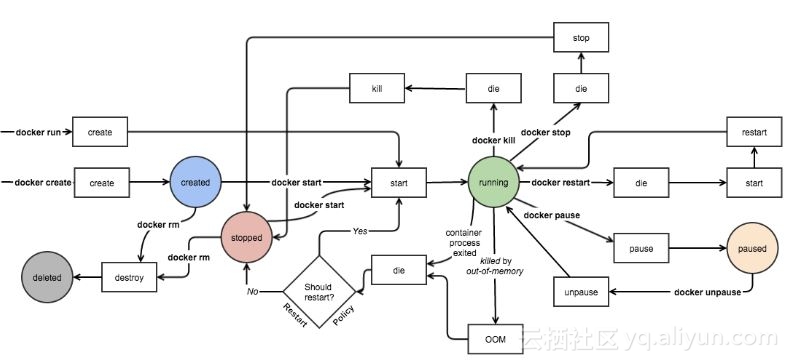
Docker 容器的状态机

5

一个容器在某个时刻可能处于以下几种状态之一:

  • created:已经被创建 (使用 docker ps -a 命令可以列出)但是还没有被启动 (使用 docker ps 命令还无法列出)
  • running:运行中
  • paused:容器的进程被暂停了
  • restarting:容器的进程正在重启过程中
  • exited:上图中的 stopped 状态,表示容器之前运行过但是现在处于停止状态(要区别于 created 状态,它是指一个新创出的尚未运行过的容器)。可以通过 start 命令使其重新进入 running 状态
  • destroyed:容器被删除了,再也不存在了

Docker 的安装

RedHat/CentOS必须要6.6版本以上,或者7.x才能安装docker,建议在RedHat/CentOS 7上使用docker,因为RedHat/CentOS 7的内核升级到了kernel 3.10,对lxc容器支持更好。

查看Linux内核版本(内核版本必须是3.10或者以上):

cat /proc/version

uname -a

lsb_release -a

##无法执行命令安装
yum install -y redhat-lsb

更新YUM源:

yum update

安装:

yum  install docker -y

检查版本:

docker -v

安装完成后,使用下面的命令来启动 docker 服务,并将其设置为开机启动:

service docker start
chkconfig docker on

下载官方的 CentOS 镜像:

docker pull centos

检查CentOS 镜像是否被获取:

docker images

下载完成后,你应该会看到:

[root@iZ2ze74fkxrls31tr2ia2fZ ~]# docker images centos
REPOSITORY       TAG        IMAGE ID     CREATED         SIZE
docker.io/centos latest    3fa822599e10    3weeks ago   203.5 MB

如果看到以上输出,说明你可以使用“docker.io/centos”这个镜像了,或将其称为仓库(Repository),该镜像有一个名为“latest”的标签(Tag),此外还有一个名为“3fa822599e10 ”的镜像 ID(可能您所看到的镜像 ID 与此处的不一致,那是正常现象,因为这个数字是随机生成的)。此外,我们可以看到该镜像只有 203.5 MB,非常小巧,而不像虚拟机的镜像文件那样庞大。

启动容器:

docker run -i -t -v /root/software/:/mnt/software/ 3fa822599e10 /bin/bash

docker run -ti ubuntu:14.04 /bin/bash

命令参数说明:
docker run <相关参数> <镜像 ID> <初始命令>

  • -i:表示以“交互模式”运行容器
  • -t:表示容器启动后会进入其命令行
  • -v:表示需要将本地哪个目录挂载到容器中,格式:-v <宿主机目录>:<容器目录>

Docker命令

我们可以把Docker 的命令大概地分类如下:

镜像操作:
    build     Build an image from a Dockerfile
    commit    Create a new image from a container's changes
    images    List images
    load      Load an image from a tar archive or STDIN
    pull      Pull an image or a repository from a registry
    push      Push an image or a repository to a registry
    rmi       Remove one or more images
    search    Search the Docker Hub for images
    tag       Tag an image into a repository
    save      Save one or more images to a tar archive 
    history   显示某镜像的历史
    inspect   获取镜像的详细信息

    容器及其中应用的生命周期操作:
    create    创建一个容器
    kill      Kill one or more running containers
    inspect   Return low-level information on a container, image or task
    pause     Pause all processes within one or more containers
    ps        List containers
    rm        删除一个或者多个容器
    rename    Rename a container
    restart   Restart a container
    run       创建并启动一个容器
    start     启动一个处于停止状态的容器
    stats     显示容器实时的资源消耗信息
    stop      停止一个处于运行状态的容器
    top       Display the running processes of a container
    unpause   Unpause all processes within one or more containers
    update    Update configuration of one or more containers
    wait      Block until a container stops, then print its exit code
    attach    Attach to a running container
    exec      Run a command in a running container
    port      List port mappings or a specific mapping for the container
    logs      获取容器的日志

    容器文件系统操作:
    cp        Copy files/folders between a container and the local filesystem
    diff      Inspect changes on a container's filesystem
    export    Export a container's filesystem as a tar archive
    import    Import the contents from a tarball to create a filesystem image

    Docker registry 操作:
    login     Log in to a Docker registry.
    logout    Log out from a Docker registry.

    Volume 操作
    volume    Manage Docker volumes

    网络操作
    network   Manage Docker networks

    Swarm 相关操作
    swarm     Manage Docker Swarm
    service   Manage Docker services
    node      Manage Docker Swarm nodes

    系统操作:
    version   Show the Docker version information
    events    持续返回docker 事件
    info      显示Docker 主机系统范围内的信息
# 查看运行中的容器
docker ps

# 查看所有容器
docker ps -a

# 退出容器
按Ctrl+D 即可退出当前容器【但退出后会停止容器】

# 退出不停止容器:
组合键:Ctrl+P+Q

# 启动容器
docker start 容器名或ID

# 进入容器
docker attach 容器名或ID

# 停止容器
docker stop 容器名或ID

# 暂停容器
docker pause 容器名或ID

#继续容器
docker unpause 容器名或ID

# 删除容器
docker rm 容器名或ID

# 删除全部容器--慎用
docker stop $(docker ps -q) & docker rm $(docker ps -aq)

#保存容器,生成镜像
docker commit 容器ID 镜像名称

#从 host 拷贝文件到 container 里面
docker cp /home/soft centos:/webapp

docker run与start的区别

docker run 只在第一次运行时使用,将镜像放到容器中,以后再次启动这个容器时,只需要使用命令docker start 即可。

docker run相当于执行了两步操作:将镜像放入容器中(docker create),然后将容器启动,使之变成运行时容器(docker start)。

6

而docker start的作用是,重新启动已存在的镜像。也就是说,如果使用这个命令,我们必须事先知道这个容器的ID,或者这个容器的名字,我们可以使用docker ps找到这个容器的信息。

7

因为容器的ID是随机码,而容器的名字又是看似无意义的命名,我们可以使用命令:

docker rename jovial_cori  centos

给这个容器命名。这样以后,我们再次启动或停止容器时,就可以直接使用这个名字:

docker [stop] [start]  new_name

而要显示出所有容器,包括没有启动的,可以使用命令:

docker ps -a

Docker配置

更改存储目录:

#复制docker存储目录
rsync -aXS /var/lib/docker/. /home/docker

#更改 docker 存储文件目录
ln -s  /home/docker  /var/lib/docker

获取IP:

docker inspect <container id>

要获取所有容器名称及其IP地址只需一个命令:

docker inspect -f '{{.Name}} - {{.NetworkSettings.IPAddress }}' $(docker ps -aq)

docker inspect --format='{{.Name}} - {{range .NetworkSettings.Networks}}{{.IPAddress}}{{end}}' $(docker ps -aq)

Docker 镜像加速器

注册个帐号

https://dev.aliyun.com/search.html

阿里云会自动为用户分配一个镜像加速器的地址,登录后进入”管理中心”–>”加速器”,里面有分配给你的镜像加速器的地址以及各个环境的使用说明。

镜像加速器地址:https://xxxxx.mirror.aliyuncs.com

如何配置镜像加速器

针对Docker客户端版本大于1.10.0的用户
您可以通过修改daemon配置文件/etc/docker/daemon.json来使用加速器:

{
    "registry-mirrors": ["<your accelerate address>"]
}

重启Docker Daemon:

sudo systemctl daemon-reload
sudo systemctl restart docker

后续:
1,查看镜像
docker ps -a
CONTAINER ID IMAGE COMMAND CREATED STATUS PORTS NAMES
1fef6edc3f23 docker.io/centos "bin/bash" About a minute ago Exited (0) 8 seconds ago affectionate_khorana
66f6e4ff1098 docker.io/centos "bin/bash" About a minute ago Exited (0) About a minute ago elastic_khorana
a44b68ea8265 75835a67d134 "/bin/bash" 7 minutes ago Exited (0) 2 minutes ago angry_meitner
d0c8cbacb8ce 75835a67d134 "/bin/bash" 25 minutes ago Exited (0) 13 minutes ago mystifying_perlman
2.更新镜像
docker commit #第一列容器ID centos:update
3.保存镜像
docker save centos:update > centos.tar
4.加载镜像
docker load < centos.tar


常见命令:

1,后台启动docker并且端口映射

docker run -itd -p 3390<物理机端口>:3390<容器端口> cd3c0fd5029a /bin/bash

2,进入docker

docker attach <容器ID>

3,退出docker,不关闭container

ctrl+p ctrl+q

4.更新镜像

docker commit <容器ID> centos:update<自己定义的名字:标签>

5.保存镜像

docker save centos:update > centos.tar

6.加载镜像

docker load < centos.tar

Mycat【数据库方式】实现全局序列号

说明:本文参考mycat官方提供的文档,结合自己的实践以及理解,做出如下整理,并附带一个分库分表的插入数据例子。
原理
在数据库中建立一张表,存放sequence名称(name),sequence当前值(current_value),步长(increment int类型每次读取多少个sequence,假设为K)等信息;
Sequence获取步骤:
1)当初次使用该sequence时,根据传入的sequence名称,从数据库这张表中读取current_value,和increment到MyCat中,并将数据库中的current_value设置为原current_value值+increment值;
2)MyCat将读取到current_value+increment作为本次要使用的sequence值,下次使用时,自动加1,当使用increment次后,执行步骤1)相同的操作.
3)MyCat负责维护这张表,用到哪些sequence,只需要在这张表中插入一条记录即可。若某次读取的sequence没有用完,系统就停掉了,则这次读取的sequence剩余值不会再使用。
配置方式
server.xml配置:

<system><property name=”sequnceHandlerType”>1</property></system>
1
注:sequnceHandlerType 需要配置为1,表示使用数据库方式生成sequence.
数据库配置:
1)创建sequence表

CREATE TABLE MYCAT_SEQUENCE (
name VARCHAR (50) NOT NULL comment “名称”,
current_value INT NOT NULL comment “当前值”,
increment INT NOT NULL DEFAULT 100 comment “步长”,
PRIMARY KEY (name)
) ENGINE = INNODB;
1
2
3
4
5
6
2)创建相关function

#取当前squence的值
DROP FUNCTION IF EXISTS mycat_seq_currval;
DELIMITER $$
CREATE FUNCTION mycat_seq_currval(seq_name VARCHAR(50))RETURNS VARCHAR(64) CHARSET ‘utf8′
BEGIN
DECLARE retval VARCHAR(64);
SET retval=’-999999999,NULL’;
SELECT CONCAT(CAST(current_value AS CHAR),’,’,CAST(increment AS CHAR)) INTO retval FROM
MYCAT_SEQUENCE WHERE NAME = seq_name;
RETURN retval;
END$$
DELIMITER ;

#设置 sequence 值
DROP FUNCTION IF EXISTS mycat_seq_setval;
DELIMITER $$
CREATE FUNCTION mycat_seq_setval(seq_name VARCHAR(50),VALUE INTEGER) RETURNS VARCHAR(64) CHARSET ‘utf8’
BEGIN
UPDATE MYCAT_SEQUENCE SET current_value = VALUE WHERE NAME = seq_name;
RETURN mycat_seq_currval(seq_name);
END$$
DELIMITER ;

#取下一个sequence的值
DROP FUNCTION IF EXISTS mycat_seq_nextval;
DELIMITER $$
CREATE FUNCTION mycat_seq_nextval(seq_name VARCHAR(50)) RETURNS VARCHAR(64) CHARSET ‘utf8′
BEGIN
UPDATE MYCAT_SEQUENCE SET current_value = current_value + increment
WHERE NAME = seq_name;
RETURN mycat_seq_currval(seq_name);
END$$
DELIMITER ;
1
2
3
4
5
6
7
8
9
10
11
12
13
14
15
16
17
18
19
20
21
22
23
24
25
26
27
28
29
30
31
32
33
3)sequence_db_conf.properties相关配置,指定sequence相关配置在哪个节点上:
例如:

COMPANY=dn3
1
注:COMPANY为表名,必须大写,dn3为schema.xml配置的dataNode节点。建议专门独立一个数据库,存放sequence表和相关的function,方便维护管理和隔离。

注意:MYCAT_SEQUENCE表和以上的3个function,需要放在同一个节点上。function请直接在具体节点的数据库上执行,如果执行的时候报:
you might want to use the less safe log_bin_trust_function_creators variable
需要对数据库做如下设置:
windows下my.ini[mysqld]加上log_bin_trust_function_creators=1
linux下/etc/my.cnf下my.ini[mysqld]加上log_bin_trust_function_creators=1
修改完后,即可在mysql数据库中执行上面的函数.
使用示例:

SELECT next value for MYCATSEQ_SAM_TEST
insert into sam_test(id_,name_) values(next value for MYCATSEQ_SAM_TEST,’test’);
# 数据库表定义了自增,在mycat也定义了主键和自增,可以用如下方式
insert into sam_test(name_) values(‘test’);
1
2
3
4
测试
1.配置schema.xml

<schema name=”TESTDB” checkSQLschema=”false” sqlMaxLimit=”100″>
<table name=”company” dataNode=”dn1,dn2″ rule=”companyRule” primaryKey=”id” autoIncrement=”true” />
</schema>

<dataNode name=”dn1″ dataHost=”localhost1″ database=”mycat_test” />
<dataNode name=”dn2″ dataHost=”localhost1″ database=”mycat_test2″ />
<dataNode name=”dn3″ dataHost=”localhost2″ database=”testmycat” />

<dataHost name=”localhost1″ maxCon=”1000″ minCon=”10″ balance=”0″
writeType=”0″ dbType=”mysql” dbDriver=”native” switchType=”1″ slaveThreshold=”100″>
<heartbeat>select user()</heartbeat>
<writeHost host=”hostM1″ url=”192.168.1.95:3306″ user=”admin” password=”admin”/>
<writeHost host=”hostM2″ url=”192.138.1.112:3306″ user=”root” password=”root”/>
</dataHost>
<!– 存放sequence数据库 –>
<dataHost name=”localhost2″ maxCon=”1000″ minCon=”10″ balance=”0″
writeType=”0″ dbType=”mysql” dbDriver=”native” switchType=”1″ slaveThreshold=”100″>
<heartbeat>select user()</heartbeat>
<writeHost host=”localhost2M2″ url=”192.138.1.112:3306″ user=”root” password=”root”/>
</dataHost>
1
2
3
4
5
6
7
8
9
10
11
12
13
14
15
16
17
18
19
20
2.配置server.xml

<property name=”sequnceHandlerType”>1</property><!– 1:使用数据库方式生成sequence –>
1
3.配置rule.xml

<tableRule name=”companyRule”>
<rule>
<columns>id</columns>
<algorithm>mod-long</algorithm>
</rule>
</tableRule>
<function name=”mod-long” class=”org.opencloudb.route.function.PartitionByMod”>
<!– how many data nodes –>
<property name=”count”>2</property>
</function>
1
2
3
4
5
6
7
8
9
10
4.配置sequence_db_conf.properties

COMPANY=dn3
1
5.数据库配置文件修改my.ini

log_bin_trust_function_creators=1
# 忽略大小写
lower_case_table_names=1
1
2
3
6.数据库表
1)分别到192.168.1.95的mycat_test数据库和mycat_test2数据库新建如下的表,由于是分库分表,所以两边都要创建。

DROP TABLE IF EXISTS `company`;
CREATE TABLE `company` (
`id` int(11) NOT NULL AUTO_INCREMENT,
`name` varchar(255) DEFAULT NULL,
PRIMARY KEY (`id`)
) ENGINE=InnoDB DEFAULT CHARSET=utf8;
1
2
3
4
5
6
注:只有数据库和mycat都设置AUTO_INCREMENT才能通过mycat命令LAST_INSERT_ID()获取插入的id
2)到192.168.1.112的testmycat数据库中执行上面的创建sequence和function过程。
3)插入数据到MYCAT_SEQUENCE表

insert into MYCAT_SEQUENCE(name,current_value,increment) values(‘COMPANY’,19,5);
1
7.mycat测试
配置完之后,重启mycat
执行

insert into company(id,name) values (next value for MYCATSEQ_COMPANY,”test”)

insert into company(name) values (“test”)
1
2
3
插入数据成功后
执行

select LAST_INSERT_ID()
1
可以看到本次插入的id

小结
如果要获取插入数据后的id,必须同时在mysql和mycat设置表的自增。
sequence_db_conf.properties配置的表名必须大写。
存放sequence表和function在同一个数据库中,且只有一个。
以上【Sequence获取步骤】是mycat原理,注意理解。
———————
作者:黄晓杰Aries
来源:CSDN
原文:https://blog.csdn.net/u010956470/article/details/70837876
版权声明:本文为博主原创文章,转载请附上博文链接!

PSSH 批量管理服务器

pssh命令是一个python编写可以在多台服务器上执行命令的工具,同时支持拷贝文件,是同类工具中很出色的,类似pdsh,个人认为相对pdsh更为简便,使用必须在各个服务器上配置好密钥认证访问。

1. 安装

安装可以使用yum或者apt-get安装,还可以使用源码安装, 由于我使用apt-get安装不好用,所以这里我只说下源码安装

wget http://parallel-ssh.googlecode.com/files/pssh-2.3.1.tar.gz 
tar xf pssh-2.3.1.tar.gz 
cd pssh-2.3.1/ 
python setup.py install

2. pssh选项说明

复制代码
--version:查看版本 
--help:查看帮助,即此信息 
-h:主机文件列表,内容格式”[user@]host[:port]” 
-H:主机字符串,内容格式”[user@]host[:port]” 
-:登录使用的用户名 
-p:并发的线程数【可选】 
-o:输出的文件目录【可选】 
-e:错误输入文件【可选】 
-t:TIMEOUT 超时时间设置,0无限制【可选】 
-O:SSH的选项 
-v:详细模式 
-A:手动输入密码模式 
-x:额外的命令行参数使用空白符号,引号,反斜线处理 
-X:额外的命令行参数,单个参数模式,同-x 
-i:每个服务器内部处理信息输出 
-P:打印出服务器返回信息
复制代码


3. 实例

(1) 查看版本

#pssh --version
#2.3.1

(2) 查看帮助

复制代码
#pssh --help
Usage: pssh [OPTIONS] command [...]

Options:
  --version             show program's version number and exit
  --help                show this help message and exit
  -h HOST_FILE, --hosts=HOST_FILE
                        hosts file (each line "[user@]host[:port]")
  -H HOST_STRING, --host=HOST_STRING
                        additional host entries ("[user@]host[:port]")
  -l USER, --user=USER  username (OPTIONAL)
  -p PAR, --par=PAR     max number of parallel threads (OPTIONAL)
  -o OUTDIR, --outdir=OUTDIR
                        output directory for stdout files (OPTIONAL)
  -e ERRDIR, --errdir=ERRDIR
                        output directory for stderr files (OPTIONAL)
  -t TIMEOUT, --timeout=TIMEOUT
                        timeout (secs) (0 = no timeout) per host (OPTIONAL)
  -O OPTION, --option=OPTION
                        SSH option (OPTIONAL)
  -v, --verbose         turn on warning and diagnostic messages (OPTIONAL)
  -A, --askpass         Ask for a password (OPTIONAL)
  -x ARGS, --extra-args=ARGS
                        Extra command-line arguments, with processing for
                        spaces, quotes, and backslashes
  -X ARG, --extra-arg=ARG
                        Extra command-line argument
  -i, --inline          inline aggregated output and error for each server
  --inline-stdout       inline standard output for each server
  -I, --send-input      read from standard input and send as input to ssh
  -P, --print           print output as we get it

Example: pssh -h hosts.txt -l irb2 -o /tmp/foo uptime
复制代码

(3) 使用主机文件列表执行pwd命令

复制代码
#pssh -h ip.txt -A -i pwd
Warning: do not enter your password if anyone else has superuser
privileges or access to your account.
Password: 
[1] 19:58:51 [SUCCESS] root@192.168.200.152
/root
[2] 19:58:51 [SUCCESS] root@192.168.200.154
/root
[3] 19:58:51 [SUCCESS] root@192.168.200.153
/root
[4] 19:58:52 [SUCCESS] root@192.168.200.155
/root
复制代码

说明: -h 后面的ip是要操作的机器ip列表,格式如下: root@192.168.200.152   -A 表示手动输入密码模式  -i表示要执行的命令

(4) 使用主机文件列表执行date命令


复制代码
#pssh -h ip.txt -A -i date
Warning: do not enter your password if anyone else has superuser
privileges or access to your account.
Password: 
[1] 20:13:36 [SUCCESS] root@192.168.200.152
2016年 07月 11日 星期一 20:10:24 CST
[2] 20:13:36 [SUCCESS] root@192.168.200.154
2016年 07月 11日 星期一 20:10:11 CST
[3] 20:13:36 [SUCCESS] root@192.168.200.153
2016年 07月 11日 星期一 20:10:56 CST
[4] 20:13:36 [SUCCESS] root@192.168.200.155
2016年 07月 11日 星期一 20:10:10 CST
复制代码


(5) 指定用户名

复制代码
#可以通过-l命令指定用户名
$pssh -h ip.txt -A -i -l root date
Warning: do not enter your password if anyone else has superuser
privileges or access to your account.
Password: 
[1] 20:13:36 [SUCCESS] 192.168.200.152
2016年 07月 11日 星期一 20:10:24 CST
[2] 20:13:36 [SUCCESS] 192.168.200.154
2016年 07月 11日 星期一 20:10:11 CST
[3] 20:13:36 [SUCCESS] 192.168.200.153
2016年 07月 11日 星期一 20:10:56 CST
[4] 20:13:36 [SUCCESS] 192.168.200.155
2016年 07月 11日 星期一 20:10:10 CST
复制代码


(6) 批量初始化服务器key

#让远程服务自动在/root/.ssh生成秘钥,方便部署证书信任
pssh -h host1.txt -l root -A "ssh-keygen -t rsa -f /root/.ssh/id_rsa -P \"\""


(7)批量修改机器密码

pssh -h host.txt -l root -A 'echo root:xxxxxxxx | chpasswd'


4. 介绍软件包内其他命令

     pscp   传输文件到多个hosts,他的特性和scp差不多
# 通过pscp对多个机器传文件,把test.sh传送到多个机器上
$ pscp.pssh -h host.txt -l root -A test.sh  

使用pscp对多个机器传文件,然后再通过pssh执行脚本,方便快捷


    pslurp   从多台远程机器拷贝文件
    pnuke    kill远程机器的进程

通过上面我们可以看到直接可以远程执行命令,对于机器的批量操作很方便。 大家使用的时候可以根据自己的实际需求编写相应的脚本

这里就简单写这几个例子。


mycat配置及使用

Mycat数据库分库分表中间件

详细文档在http://www.mycat.io/

本次主要想做分库分表的操作,将mysql分别部署在不同的机器上,mycat作为Proxy。

安装非常简单,下载相应的包就行。但是需要安装最新版本的java


yum install java-1.8.0-openjdk-src.x86_64

之后需要进行三个配置文件的配置

1,server.xml


<property name="sequnceHandlerType">3</property>


2,schema.xml

<dataNode name=”dn1″ dataHost=”localhost1″ database=”tt” />
<dataNode name=”dn2″ dataHost=”localhost2″ database=”tt” />

<dataHost name=”localhost2″ maxCon=”1000″ minCon=”10″ balance=”0″
writeType=”0″ dbType=”mysql” dbDriver=”native” switchType=”1″ slaveThreshold=”100″>
<heartbeat>select user()</heartbeat>
<writeHost host=”hostS1″ url=”IP:PORT” user=”root”
password=”XXX” />
</dataHost>

<dataHost name=”localhost2″ maxCon=”1000″ minCon=”10″ balance=”0″
writeType=”0″ dbType=”mysql” dbDriver=”native” switchType=”1″ slaveThreshold=”100″>
<heartbeat>select user()</heartbeat>
<writeHost host=”hostS1″ url=”IP:PORT” user=”root”
password=”XXX” />
</dataHost>

3,rule.xml

<function name=”mod-long” class=”io.mycat.route.function.PartitionByMod”>
<!– how many data nodes –>
<property name=”count”>2</property>
</function>

然后就可以根据主键id平均请求到不同的mysql。作为水平扩展。这里自增主键的方式可以参考官方文档。我用0的时候总是偶数,分表非常不友好。

Tesseract-OCR的简单使用与训练

Tesseract,一款由HP实验室开发由Google维护的开源OCR(Optical Character Recognition , 光学字符识别)引擎,与Microsoft Office Document Imaging(MODI)相比,我们可以不断的训练的库,使图像转换文本的能力不断增强;如果团队深度需要,还可以以它为模板,开发出符合自身需求的OCR引擎。

源码地址为:https://github.com/tesseract-ocr/tesseract

EXE可执行文件地址:http://download.csdn.net/download/whatday/7740469

接下来,我们将在Windows环境下安装Tesseract并实现简单的转换和训练:

1、Tesseract实现

大体流程:Tesseract安装 -> 打开命令行 -> 生成目标文件

Tesseract安装

下载tesseract-ocr-setup-3.02.02.exe安装包,安装成功后会在相应磁盘下有Tesseract-OCR文件夹,如图

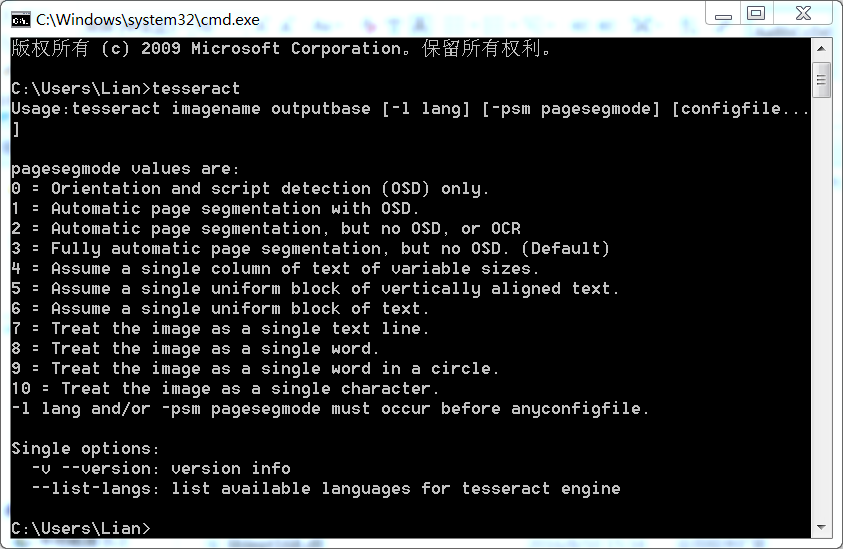
打开命令行

打开命令行,输入tesseract,回车;以下便是tesseract的大体面貌:

生成目标文件

先准备一张图片文件,如test.png

将命令行切换至目标图像文件目录,比如我们转换文件为test.png(图片文件允许多种格式),位于C:\Users\Lian\Desktop\test;然后在命令行中输入

tesseract test.png output_1 –l eng

【语法】:  tesseract imagename outputbase [-l lang] [-psm pagesegmode] [configfile…]

imagename为目标图片文件名,需加格式后缀;outputbase是转换结果文件名;lang是语言名称(在Tesseract-OCR中tessdata文件夹可看到以eng开头的语言文件eng.traineddata),如不标-l eng则默认为eng。

打开文件output_1.txt,发现tesseract成功的将图像转换成152408

可喜可贺,说明老牌名将tesseract还是很强的!但是还是有点不够准确,那么我们有没有什么办法能提高tesseract识别字符准确率呢?接下来,我们将使用配套训练工具jTessBoxEditor来训练样本,来提高我们的准确率!


2、Tesseract训练:

大体流程为:安装jTessBoxEditor -> 获取样本文件 -> Merge样本文件 –> 生成BOX文件 -> 定义字符配置文件 -> 字符矫正 -> 执行批处理文件 -> 将生成的traineddata放入tessdata中

安装jTessBoxEditor

下载jTessBoxEditor,地址https://sourceforge.net/projects/vietocr/files/jTessBoxEditor/;解压后得到jTessBoxEditor,由于这是由Java开发的,所以我们应该确保在运行jTessBoxEditor前先安装JRE(Java Runtime Environment,Java运行环境)。

获取样本文件

我们可以用画图工具绘制样本文件,数量越多越好,我自己画了5张图,如图:

【注意】:样本图像文件格式必须为tif\tiff格式,否则在Merge样本文件的过程中会出现 Couldn’t Seek 的错误。

Merge样本文件

打开jTessBoxEditor,Tools->Merge TIFF,将样本文件全部选上,并将合并文件保存为num.font.exp0.tif

生成BOX文件

打开命令行并切换至num.font.exp0.tif所在目录,输入,生成文件名为num.font.exp0.box

tesseract num.font.exp0.tif num.font.exp0 batch.nochop makebox

【语法】:tesseract [lang].[fontname].exp[num].tif [lang].[fontname].exp[num] batch.nochop makebox  

lang为语言名称,fontname为字体名称,num为序号;在tesseract中,一定要注意格式。

定义字符配置文件

在目标文件夹内生成一个名为font_properties的文本文件,内容为

font 0 0 0 0 0

【语法】:<fontname> <italic> <bold> <fixed> <serif> <fraktur>  

fontname为字体名称,italic为斜体,bold为黑体字,fixed为默认字体,serif为衬线字体,fraktur德文黑字体,1和0代表有和无,精细区分时可使用。

字符矫正

打开jTessBoxEditor,BOX Editor -> Open,打开num.font.exp0.tif;矫正<Char>上的字符,记得<Page>有好多页噢!

修改后记得保存。

执行批处理文件

在目标目录下生成一个批处理文件

复制代码
rem 执行改批处理前先要目录下创建font_properties文件 
echo Run Tesseract for Training.. 
tesseract.exe num.font.exp0.tif num.font.exp0 nobatch box.train 
 
echo Compute the Character Set.. 
unicharset_extractor.exe num.font.exp0.box 
mftraining -F font_properties -U unicharset -O num.unicharset num.font.exp0.tr 


echo Clustering.. 
cntraining.exe num.font.exp0.tr 

echo Rename Files.. 
rename normproto num.normproto 
rename inttemp num.inttemp 
rename pffmtable num.pffmtable 
rename shapetable num.shapetable  

echo Create Tessdata.. 
combine_tessdata.exe num. 
echo. & pause
复制代码

保存后执行即可,执行结果如图:

最终文件夹内会有以下文件,如图:

将生成的traineddata放入tessdata中

最后将num.trainddata复制到Tesseract-OCR中tessdata文件夹即可。


3、最后的测试

按照之前步骤,使用命令行输入

tesseract test.png output_2 -l num

我们可以看到新生成的文件output_2的内容为762408,内容完全正确。细心的人会发现,最后一句指令,我们使用了指令[-l num]而不是[-l eng]。这说明,最后一次转换我们使用的是新生成的num语言的匹配库而不是默认的eng语言匹配库。


一个简单的调用顺序:
1,yum install tesseract
2,pip3 install pytesseract

#!/bin/bash
# -*- coding: UTF-8 -*-

from PIL import Image
import pytesseract

class OCR:

    def __init__(self) :
        print 'start'

    def getText(self, name) :
        img = Image.open(name)
        text = pytesseract.image_to_string(img, lang='chi_sim')
        print(text)


if __name__ == '__main__' :
    ocr = OCR()
    ocr.getText('./test.jpg')

也可以用命令直接执行 tesseract test.png out -l eng

python 抓取环境库

最近在用python抓取一些文章,python的库比较丰富,在抓取上的确很有优势,下面是引入的一些库

更新:pip install –upgrade pip

pip2 install pymysql
pip install Pillow
pip install beautifulsoup4
pip install lxml
pip install html5lib

包括了Mysql,图片解析和beautifulsoup的相关库,当然还可以用phantomjs做前端抓取,非常有用。

[转]反爬虫破解系列-汽车之家利用css样式替换文字破解方法

网站:

汽车之家:http://club.autohome.com.cn/ 以论坛为例

反爬虫措施:

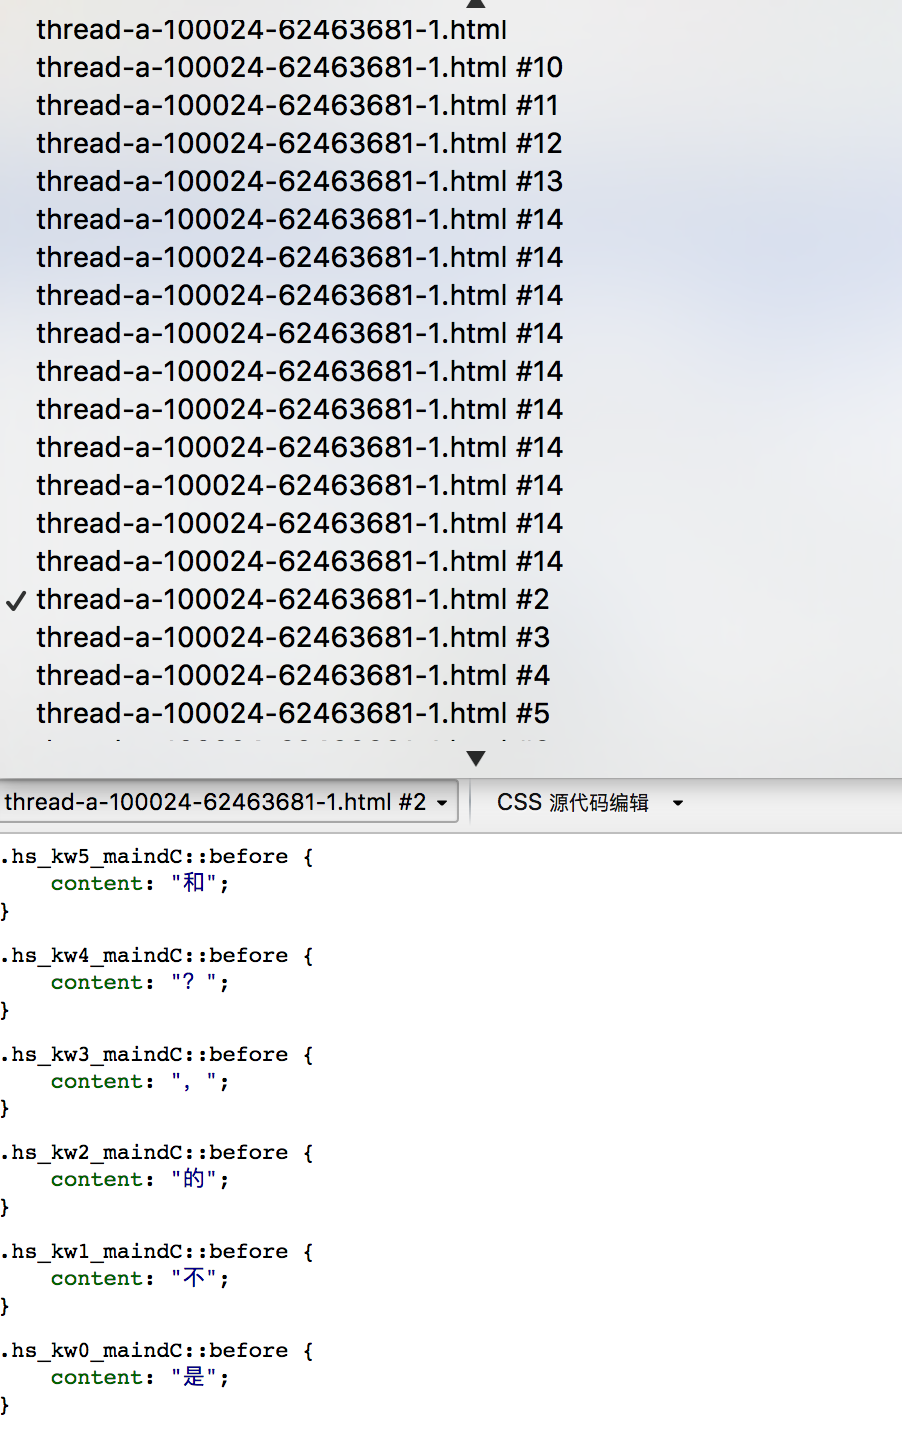
在论坛发布的贴子正文中随机抽取某几个字使用span标签代替,标签内容位空,但css样式显示为所代替的文。这样不会

影响正常用户的阅读,只是在用鼠标选择的时候是选不到被替换的文字的,对爬虫则会造成采集内容不全的影响。

原理分析:

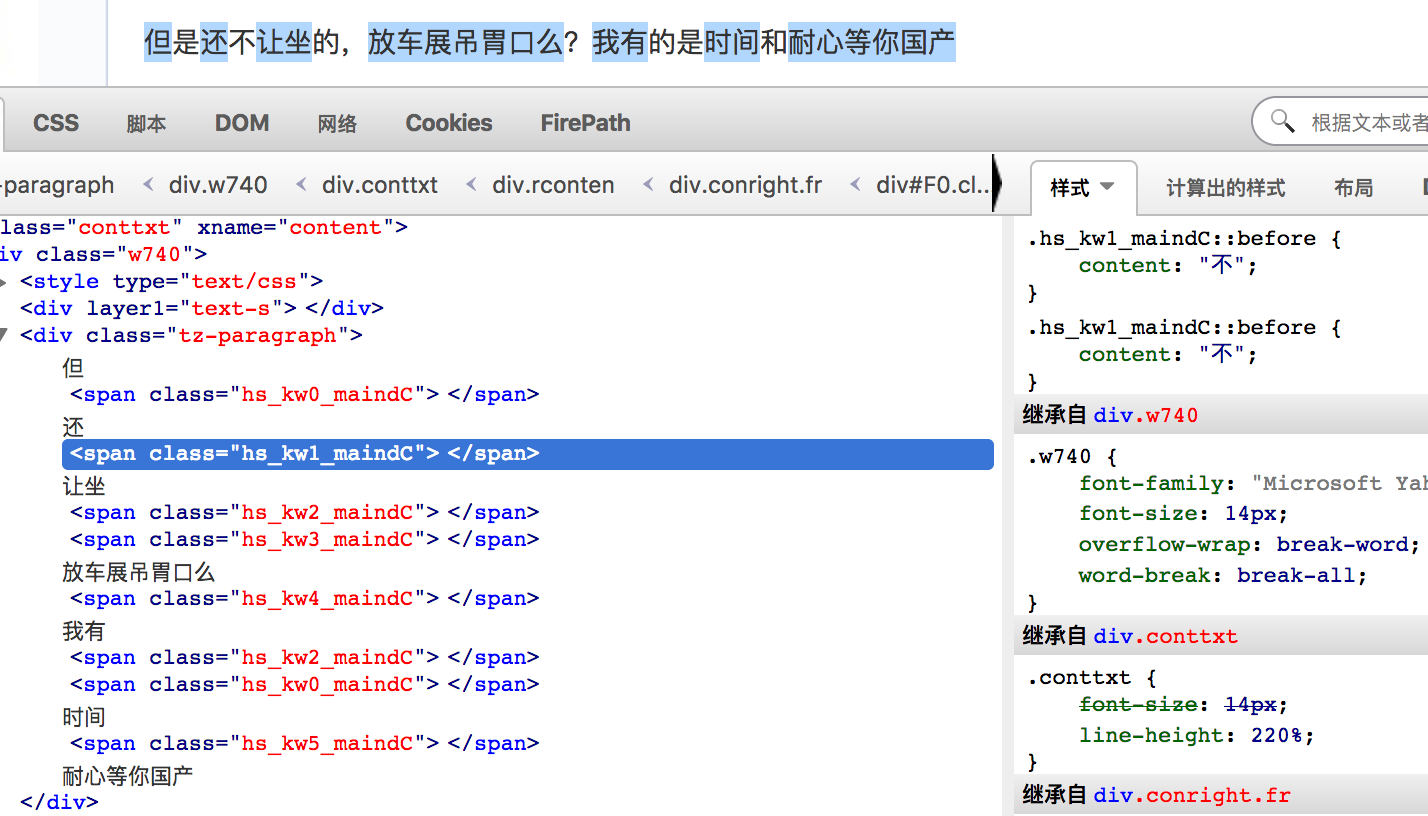
先看一下span标签的样式

截图是火狐浏览器的firebug的html面板。我们可以看到正文中每个span标签的样式都是一个文字,我们只需要找到每个

span标签的class属性于文字的对应关系即可还原正文内容,于是我找了一下css样式是在哪里定义的。找到了这样一个文

件,在firebug的css面板中可以看到所有的css文件,然后我尝试打开了一下这个url,发现结果还是帖子页面而非css文件

通过抓包也没有抓到类似这样的css文件,一番尝试无果后,我明白了,这个css文件应该是利用js生成的,于是我开始寻

找生成这样的文件的js代码,基本上就是拿各种关键词到各个js文件或者源代码中搜索,例如 ::before、content、hs_kw

等。然后发现js代码存在于网页源代码中,可以利用搜索 HS_ZY来定位到这段js代码,下面就是对js代码的分析破解了,

复制这段js代码到 http://jsbeautifier.org/ 一个js格式化工具网站。格式化之后,发现js代码是被混淆过的,这就比较蛋疼

了,幸好之前也接触过此类混淆,大概明白混淆的原理,无非就是将变量名随机替换,将完整代码拆分后用变量相加之类的,

于是在一番很麻烦的将各种变量手工替换回去之后,大概明白了js代码的主逻辑。

复制代码
(function(hZ_) {
    
    functionEW_() { = DV_()[decodeURIComponent]('%E3%80%81%E3%80%82%E4%B8%80%E4%B8%8A%E4%B8%8B%E4%B8%8D%E4%BA%86%E4%BA%94%E5%92%8C%E5%9C%B0%E5%A4%9A%E5%A4%A7%E5%A5%BD%E5%B0%8F%E5%BE%88%E5%BE%97%E6%98%AF%E7%9A%84%E7%9D%80%E8%BF%9C%E9%95%BF%E9%AB%98%EF%BC%81%EF%BC%8C%EF%BC%9F'Ÿ yc_()); 
    = la_((yc_() 23; 3; 19; 17; 9; 1; 8; 12; 18; 13; 2; 4; 16; 5; 6; 21; 15; 11; 22; 14; 24; 0; 10; 7; 20), lf_(;)); 
    = la_((10 _7, 6 _0; 2 _33, 14 _18; 8 _45, 8 _36; 0 _71, 16 _54; 13 _76, 3 _72; 0 _107, 16 _90; 15 _110, 1 _108; 4 _139, 12 _126; 9 _152, 7 _144; 10 _169, 6 _162; 4 _193, 12 _180; 11 _204, 5 _198; 3 _230, 13 _216; 1 _250, 15 _234; 13 _256, 3 _252; 6 _281, 10 _270; 9 _296, 7 _288; 13 _310, 3 _306; 6 _335, 10 _324; 7 _352, 9 _342; 6 _371, 10 _360; 5 _390, 11 _378; 5 _408, 11 _396; 7 _424, 9 _414; 6 _443, 10 _432lf_(;)), yc_(;));
            Uj_();
            return;;
        }
    function mS_() {
        for (Gx_ = 0; Gx_ < nf_.length; Gx_++) {
            var su_ = Pn_(nf_[Gx_], ',');
            var KN_ = '';
            for (Bk_ = 0; Bk_ < su_.length; Bk_++) {
                KN_ += ui_(su_[Bk_]) + '';
            }
            Kx_(Gx_, KN_);
        }
    }
    function NH_(Gx_) {
        return '.hs_kw' + Gx_ + '_maindC';
    }
    function Ln_() {
        return '::before { content:'
    }
})(document);
复制代码

很简单的逻辑,预先定义好哪几个字要被替换,上面代码中的那个很多%的字符串就是被替换的文字串,然后定义好每个文

字的序号,最后按照文字的序号对文字串进行重新排序并生成css样式,注意,最一开始的span标签的class属性中是有个序

号的,这个序号就是用来定位应该对应哪个文字。

接下来要做的就是无非就是从js代码中找到这个文字串,找到文字串的顺序,然后进行重排,然后根据span标签序号对原文

进行反向替换,从而得到完整的内容。

破解步骤:

简单整理一下:

1、从js代码中找到被替换的文字串和顺序

2、重排文字串

3、对原文中span标签根据class序号进行替换

其实2、3都比较简单,重点是第一步,找到被替换的文字串和顺序,由于源代码中js代码是被混淆过的,无法直接看出哪个

是文字串,所以首先应该对js代码进行反混淆,这个反混淆也不是说非得完整的还原所有的js代码,其实只要能反混淆到能

让我们看出文字串和顺序是什么就行了。

说一下反混淆的思路,其实很简单。就是执行起来比较麻烦而已,混淆是利用将一个简单的变量定义成复杂的js代码的方法

实现的,但这种混淆方式其实是有限的(这个有限指的是混淆用的工具在生成混淆代码时肯定是人为预先定义好了几种模式

,人为定义的肯定是有限的,只要你把所有的模式找出来,就可以还原了)。举个例子

function iq_() {
        'return iq_';
        return '3';
    }

这段代码其实你可以简单的认为就是变量iq()等于’3’,使用正则匹配这样的代码模式,然后提取关键字:函数名和最后一个

return的值,然后将提取到的信息保存起来用于对js代码进行全文替换。

复制代码
function cz_() {
        function _c() {
            return 'cz_';
        };
        if (_c() == 'cz__') {
            return _c();
        } else {
            return '84';
        }
    }
复制代码

这段代码复杂了一些,增加了判断,不过也简单,利用正则匹配这样的模式,然后提取关键字:函数名、第一个return的值,

判断中==后面的值,最后一个return的值,然后自己进行判断来确定cz_()的值应该是多少,保存起来进行全文替换。

以此类推,每种模式都可以使用正则来提取关键字并进行全文替换来反混淆,最后我们会得到一个大概被还原的js代码,其

中的文字串和顺序都清晰可见,再使用正则匹配出来就可以了。需要注意的一点是有时候被替换的不是单个文字,而是一些

词语,这是找到的顺序是”3,1;23,5″这样的,不过这些小伎俩应该不算什么,很好解决。

PS1:

发现一种新的模式,以前没注意,span的class属性hs_kw后面还有一串字符,估计是用来标示类别的,一般的网页

上只有一种class,出现多种的时候对应的源码中就会存在多段js代码,每段js代码对应一种class,关键是找到js代码对应的

class类型,然后分类型替换就行了。

结语:

这个建议大家自己动手做一下,还是比较有意思的,完整的破解代码见我的github

https://github.com/duanyifei/antispider/blob/master/autohome.py

编译php报错cc: 编译器内部错误:已杀死(程序 cc1) Please submit a full bug report, with preprocessed source if appropri

报错信息

7.0.23/ext/fileinfo/ -DPHP_ATOM_INC -I/usr/local/src/php-7.0.23/include -I/usr/local/src/php-7.0.23/main -I/usr/local/src/php-7.0.23 -I/usr/local/src/php-7.0.23/ext/date/lib -I/usr/include/libxml2 -I/usr/include/freetype2 -I/usr/local/src/php-7.0.23/ext/mbstring/oniguruma -I/usr/local/src/php-7.0.23/ext/mbstring/libmbfl -I/usr/local/src/php-7.0.23/ext/mbstring/libmbfl/mbfl -I/usr/local/src/php-7.0.23/ext/sqlite3/libsqlite -I/usr/local/src/php-7.0.23/ext/zip/lib -I/usr/local/src/php-7.0.23/TSRM -I/usr/local/src/php-7.0.23/Zend  -D_REENTRANT  -I/usr/include -g -O2 -fvisibility=hidden -pthread -DZTS   -c /usr/local/src/php-7.0.23/ext/fileinfo/libmagic/apprentice.c -o ext/fileinfo/libmagic/apprentice.lo
cc: 编译器内部错误:已杀死(程序 cc1)
Please submit a full bug report,
with preprocessed source if appropriate.
See <http://bugzilla.redhat.com/bugzilla> for instructions.
make: *** [ext/fileinfo/libmagic/apprentice.lo] 错误 1
  • 1
  • 2
  • 3
  • 4
  • 5
  • 6

解决方法:

这个原因是内存不足, 在linux下增加临时swap空间
step 1:
#sudo dd if=/dev/zero of=/home/swap bs=64M count=16
注释:of=/home/swap,放置swap的空间; count的大小就是增加的swap空间的大小,64M就是块大小,这里是64MB,所以总共空间就是bs*count=1024MB.这里分配空间的时候需要一点时间,等待执行完毕。

step 2:
# sudo mkswap /home/swap (可能会提示warning: don’t erase bootbits sectorson whole disk. Use -f to force,不用理会)
注释:把刚才空间格式化成swap各式
step 3:
#sudo swapon /home/swap
注释:使刚才创建的swap空间
step 4:执行你相关的操作,如make
如果创建了临时空间仍然提示 “g++: 内部错误:Killed (程序 cc1plus)”,可能分配的空间不够大,可继续分配更大的空间。

关闭:
step 1:sudo swapoff /home/swap
step 2:sudo rm /home/swap

ffmpeg-2.5.2 在centos 6.4 x86_64 上编译安装全过程

原始编译参数

./configure –extra-libs=-ldl –prefix=/opt/ffmpeg –enable-avresample –disable-debug –enable-nonfree –enable-gpl –enable-version3 –enable-libpulse –enable-libopencore-amrnb –enable-libopencore-amrwb –disable-decoder=amrnb –disable-decoder=amrwb –enable-libx264 –enable-libx265 –enable-libfdk-aac –enable-libvorbis –enable-libmp3lame –enable-libopus –enable-libvpx –enable-libspeex –enable-libass –enable-avisynth –enable-libsoxr –enable-libxvid –enable-libvo-aacenc

最终优化后编译参数

./configure –extra-libs=-ldl –prefix=/opt/ffmpeg –enable-avresample –disable-debug –enable-nonfree –enable-gpl –enable-version3 –enable-libpulse –enable-libopencore-amrnb –enable-libopencore-amrwb –disable-decoder=amrnb –disable-decoder=amrwb –enable-libx264 –enable-libfdk-aac –enable-libvorbis –enable-libmp3lame –enable-libopus –enable-libvpx –enable-libspeex –enable-libass –enable-avisynth –enable-libsoxr –enable-libxvid –enable-libvo-aacenc

为了不用编译每个包,添加如下yum源: 创建一个这样的文件: /etc/yum.repos.d/linuxtech.repo

[linuxtech]
name=LinuxTECH
baseurl=http://pkgrepo.linuxtech.net/el6/release/
enabled=1
gpgcheck=1
gpgkey=http://pkgrepo.linuxtech.net/el6/release/RPM-GPG-KEY-LinuxTECH.NET

  1. yasm/nasm not found or too old. Use –disable-yasm for a crippled build.
    sudo yum install yasm.x86_64 yasm-devel.x86_64
  2. ERROR: libass not found using pkg-config
    sudo yum install libass.x86_64 libass-devel.x86_64
  3. ERROR: libfdk_aac not found
    wget http://iweb.dl.sourceforge.net/project/opencore-amr/fdk-aac/fdk-aac-0.1.3.tar.gz
    tar xzf fdk-aac-0.1.3.tar.gz
    cd fdk-aac-0.1.3
    ./configure
    make
    sudo make install
  4. ERROR: libmp3lame >= 3.98.3 not found
    sudo yum install libmp3lame.x86_64 libmp3lame-devel.x86_64
  5. ERROR: libopencore_amrnb not found
    sudo yum install libopencore-amr-devel.x86_64 libopencore-amr.x86_64
  6. ERROR: libopencore_amrwb not found
    sudo yum install libopencore-amr-devel.x86_64 libopencore-amr.x86_64
  7. ERROR: opus not found using pkg-config sudo yum install opus.x86_64 opus-devel.x86_64
  8. ERROR: libpulse not found using pkg-config
    sudo yum install pulseaudio-libs.x86_64 pulseaudio-libs-devel.x86_64
  9. ERROR: libsoxr not found
    sudo yum install libsoxr-devel.x86_64 libsoxr.x86_64
  10. ERROR: speex not found using pkg-config
    sudo yum install speex.x86_64 speex-devel.x86_64
  11. ERROR: libvo_aacenc not found
    wget http://hivelocity.dl.sourceforge.net/project/opencore-amr/vo-aacenc/vo-aacenc-0.1.3.tar.gz
    tar xzf vo-aacenc-0.1.3.tar.gz
    cd vo-aacenc-0.1.3
    ./configure
    make
    sudo make install
  12. ERROR: libvorbis not found
    sudo yum install libvorbis-devel.x86_64 libvorbis.x86_64
  13. ERROR: libvpx decoder version must be >=0.9.1
    sudo yum install libvpx.x86_64 libvpx-devel.x86_64
  14. ERROR: libx264 not found
    git clone git://git.videolan.org/x264.git
    cd x264
    ./configure –enable-static
    make
    sudo  make install
    sudo ldconfig
  15. ERROR: x265 not found using pkg-config
    去掉编译参数: –enable-libx265
    ./configure –extra-libs=-ldl –prefix=/opt/ffmpeg –enable-avresample –disable-debug –enable-nonfree –enable-gpl –enable-version3 –enable-libpulse –enable-libopencore-amrnb –enable-libopencore-amrwb –disable-decoder=amrnb –disable-decoder=amrwb –enable-libx264 –enable-libfdk-aac –enable-libvorbis –enable-libmp3lame –enable-libopus –enable-libvpx –enable-libspeex –enable-libass –enable-avisynth –enable-libsoxr –enable-libxvid –enable-libvo-aacenc
  16. ERROR: libxvid not found
    sudo yum install libxvidcore-devel.x86_64 libxvidcore.x86_64
  17. ./ffmpeg: error while loading shared libraries: libvo-aacenc.so.0: cannot open shared object file: No such file or directory

    sudo vim /etc/ld.so.conf.d/local_lib.conf

    /usr/local/lib

    sudo ldconfig